Tuesday, 3 May 2016

Pivot Operator in SQL Server Simplified

Dynamic PIVOT in Sql Server

In the Previous Post PIVOT and UNPIVOT in Sql Server explained how PIVOT relational operator can be used to transform columns distinct values as Columns in the result set by mentioning all the distinct column values in the PIVOT operators PIVOT columns IN clause. This type of PIVOT query is called Static PIVOT query, because if the PIVOT column in the source table get’s extra unique values after the initial query then that will not reflect in the PIVOT query result unless it is mentioned in the PIVOT Columns IN clause. Static PIVOT queries are fine as long as we know that the PIVOT column values never change, for instance if PIVOT column values are MONTH or Day of the Week or hour of the day etc.
In this Article will present how we can write a Dynamic PIVOT query with an example, where we don’t need to mention the PIVOT columns each unique values and no need to worry if PIVOT column gets extra unique values after the initial query.
First Create a Temporary Table #CourseSales with sample records as depicted in the below image by using the following script:
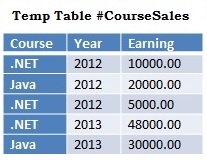
Table to be Pivoted in Sql
--Create Temporary Table #CourseSales
CREATE TABLE #CourseSales
(Course VARCHAR(50),Year INT,Earning MONEY)
GO
--Populate Sample records
INSERT INTO #CourseSales VALUES('.NET',2012,10000)
INSERT INTO #CourseSales VALUES('Java',2012,20000)
INSERT INTO #CourseSales VALUES('.NET',2012,5000)
INSERT INTO #CourseSales VALUES('.NET',2013,48000)
INSERT INTO #CourseSales VALUES('Java',2013,30000)
GO

PIVOT #CourseSales Table data on the Course column Values

Let us first understand the Static PIVOT query and then see how we can modify this Static PIVOT query to Dynamic.

Static PIVOT query
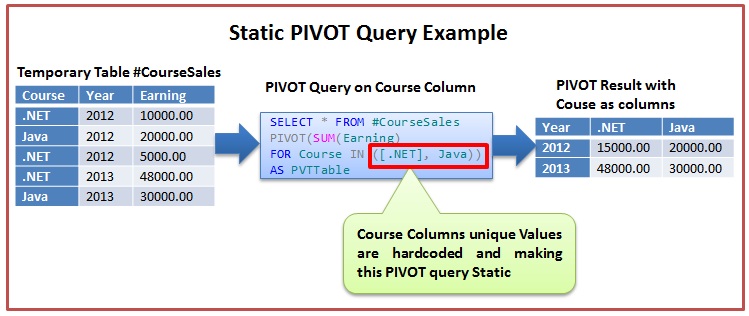
Static PIVOT Query
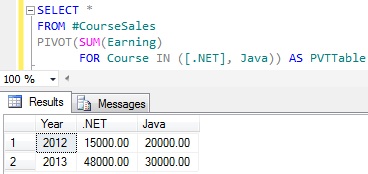
Below Static PIVOT script pivots the #CourseSales Table data so that the Course columns distinct values are transformed as Columns in the result set as depicted in the above image.
SELECT *
FROM #CourseSales
PIVOT(SUM(Earning)
      FOR Course IN ([.NET], Java)) AS PVTTable
RESULT:
Static PIVOT Query In Sql Server
Let us insert one more row in the #CourseSales table for the new course SQL Server with below insert statement.
INSERT INTO #CourseSales VALUES('Sql Server',2013,15000)
Now rerun the above PIVOT query.
RESULT:
Static PIVOT Query In Sql Server
From the above result it is clear that the newly added course Sql Server sales data is not reflected in the result.

Dynamic PIVOT Query

To make the above Static PIVOT query to dynamic, basically we have to remove the hardcoded PIVOT column names specified in the PIVOT operators PIVOT columns IN clause. Below query demonstrates this.
DECLARE @DynamicPivotQuery AS NVARCHAR(MAX)
DECLARE @ColumnName AS NVARCHAR(MAX)
 
--Get distinct values of the PIVOT Column
SELECT @ColumnName= ISNULL(@ColumnName + ',','')
       + QUOTENAME(Course)
FROM (SELECT DISTINCT Course FROM #CourseSales) AS Courses
 
--Prepare the PIVOT query using the dynamic
SET @DynamicPivotQuery =
  N'SELECT Year, ' + @ColumnName + '
    FROM #CourseSales
    PIVOT(SUM(Earning)
          FOR Course IN (' + @ColumnName + ')) AS PVTTable'
--Execute the Dynamic Pivot Query
EXEC sp_executesql @DynamicPivotQuery
[ALSO READ] How to replace NULL value by 0 in the Dynamic Pivot result – Sql Server
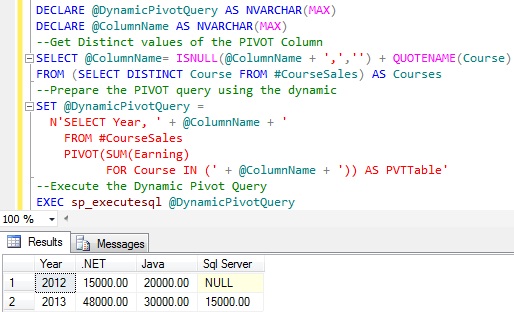
RESULT:
Dynamic PIVOT Query in Sql Server
From the above result it is clear that this query is a True Dynamic PIVOT query as it reflected all the courses in the #CourseSales table without needing to write hardcoded course names in the PIVOT query.

Tuesday, 15 March 2016

All Type of File Convertion with Dotnet.FW

* Pdf to PPT
 
 // Load PDF document
            Aspose.Pdf.Document doc = new Aspose.Pdf.Document(@"C:\pdftest\IN_7664539.pdf");
            // Instantiate PptxSaveOptions instance
            Aspose.Pdf.PptxSaveOptions pptx_save = new Aspose.Pdf.PptxSaveOptions();
            // Save the output in PPTX format
            doc.Save("c:/pdftest/IN_7664539.pptx", pptx_save);


----------------------------------------------------- 
 
* Pdf to HTML 
 
public static void SavingOfAllPageHtmlsApart()
{
    Document doc = new Document(@"C:\PDFTest\NimbusSRP.pdf");

    // Pay attention that we put non-existing path here : since we use custon resource processing it won't be in use.
    // If You forget implement some of required saving strategies(CustomHtmlSavingStrategy,CustomResourceSavingStrategy,CustomCssSavingStrategy), then saving will return "Path not found" exception
    string outHtmlFile = @"T:\SomeNonExistingFolder\NimbusSRP.html";

    // Create HtmlSaveOption with custom saving strategies that will do all the saving job
    // in such approach You can split HTML in pages if You will
    HtmlSaveOptions saveOptions = new HtmlSaveOptions();
    saveOptions.SplitIntoPages = true;

    saveOptions.CustomHtmlSavingStrategy = new HtmlSaveOptions.HtmlPageMarkupSavingStrategy(StrategyOfSavingHtml);
    saveOptions.CustomResourceSavingStrategy = new HtmlSaveOptions.ResourceSavingStrategy(CustomSaveOfFontsAndImages);
    saveOptions.CustomStrategyOfCssUrlCreation = new HtmlSaveOptions.CssUrlMakingStrategy(CssUrlMakingStrategy);
    saveOptions.CustomCssSavingStrategy = new HtmlSaveOptions.CssSavingStrategy(CustomSavingOfCss);

    saveOptions.FontSavingMode = HtmlSaveOptions.FontSavingModes.SaveInAllFormats;
    saveOptions.RasterImagesSavingMode = HtmlSaveOptions.RasterImagesSavingModes.AsEmbeddedPartsOfPngPageBackground;
    doc.Save(outHtmlFile, saveOptions);

    Console.WriteLine("Done");
    Console.ReadLine();
}
 
 
*PDF to excel 
// Load PDF document
Aspose.Pdf.Document doc = new Aspose.Pdf.Document(@"C:\input.pdf");
// Instantiate ExcelSave Option object
Aspose.Pdf.ExcelSaveOptions excelsave = new ExcelSaveOptions();
// Save the output in XLS format
doc.Save("c:/Resultant.xls", excelsave); 
------------------------------------------------
** Text file to Pdf file 
// Read the source text file
TextReader tr = new StreamReader(myDir + "Formtext.txt");

// Instantiate a Document object by calling its empty constructor
Document doc = new Document();

// Add a new page in Pages collection of Document
Page page = doc.Pages.Add();

// Create an instance of TextFragmet and pass the text from reader object to its constructor as argument
TextFragment text = new TextFragment(tr.ReadToEnd());
//text.TextState.Font = FontRepository.FindFont("Arial Unicode MS");
                
// Add a new text paragraph in paragraphs collection and pass the TextFragment object
page.Paragraphs.Add(text);

// Save resultant PDF file
doc.Save(myDir+"TexttoPDF.pdf"); 
---------------------------------------------------------
 
XML
<?xml version="1.0" encoding="utf-8" ?>
<Document xmlns="Aspose.Pdf">
  <Page id="mainSection">
    <TextFragment>
      <TextSegment id="boldHtml">segment1</TextSegment>
    </TextFragment>

    <TextFragment>
      <TextSegment id="strongHtml">segment2</TextSegment>
    </TextFragment>
  </Page>
</Document>
 ----------------------------------------------------
C#
// instantiate Document object
Document doc = new Document();
// bind source XML file
doc.BindXml("source.xml");
// get reference of page object from XML
Page page = (Page)doc.GetObjectById("mainSection");
// get reference of first TextSegment with ID boldHtml
TextSegment segment = (TextSegment)doc.GetObjectById("boldHtml");
// get reference of second TextSegment with ID strongHtml
segment = (TextSegment)doc.GetObjectById("strongHtml");
// save resultant PDF file
doc.Save("Resultant.pdf");
 -----------------------------------------------
***PDF to Excel 
C#
// Load PDF document
Aspose.Pdf.Document doc = new Aspose.Pdf.Document(@"C:\input.pdf");
// Instantiate ExcelSave Option object
Aspose.Pdf.ExcelSaveOptions excelsave = new ExcelSaveOptions();
// Save the output in XLS format
doc.Save("c:/Resultant.xls", excelsave);
-----------------------------------------

Schema

The schema is extended with the ability to use external fonts. Furthermore, when converting PDF files to XML, images are represented as separate files in the same directory as the output XML is created. Fonts are represented as TrueType fonts and the corresponding files (filename_fontN.ttf) are created along with the output XML.
XML is formed in accordance with the DTD schema specified below:
XML
<xs:schema attributeFormDefault="unqualified" elementFormDefault="qualified" xmlns:xs="http://www.w3.org/2001/XMLSchema">
  <xs:element name="pdf2xml">
    <xs:complexType>
      <xs:sequence>
        <xs:element type="xs:string" name="title"/>
        <xs:element name="page" maxOccurs="unbounded" minOccurs="0">
          <xs:complexType>
            <xs:sequence>
              <xs:element name="font" maxOccurs="unbounded" minOccurs="0">
                <xs:complexType>
                  <xs:sequence>
                    <xs:element name="text" maxOccurs="unbounded" minOccurs="0">
                      <xs:complexType>
                        <xs:simpleContent>
                          <xs:extension base="xs:string">
                            <xs:attribute type="xs:float" name="x" use="optional"/>
                            <xs:attribute type="xs:float" name="y" use="optional"/>
                            <xs:attribute type="xs:float" name="width" use="optional"/>
                            <xs:attribute type="xs:float" name="height" use="optional"/>
                          </xs:extension>
                        </xs:simpleContent>
                      </xs:complexType>
                    </xs:element>
                    <xs:element name="img" minOccurs="0">
                      <xs:complexType>
                        <xs:simpleContent>
                          <xs:extension base="xs:string">
                            <xs:attribute type="xs:float" name="x" use="optional"/>
                            <xs:attribute type="xs:float" name="y" use="optional"/>
                            <xs:attribute type="xs:float" name="width" use="optional"/>
                            <xs:attribute type="xs:float" name="height" use="optional"/>
                            <xs:attribute type="xs:string" name="src" use="optional"/>
                          </xs:extension>
                        </xs:simpleContent>
                      </xs:complexType>
                    </xs:element>
                  </xs:sequence>
                  <xs:attribute type="xs:float" name="size" use="optional"/>
                  <xs:attribute type="xs:string" name="face" use="optional"/>
                  <xs:attribute type="xs:string" name="src" use="optional"/>
                  <xs:attribute type="xs:string" name="color" use="optional"/>
                  <xs:attribute type="xs:boolean" name="italic" use="optional"/>
                  <xs:attribute type="xs:boolean" name="bold" use="optional"/>
                </xs:complexType>
              </xs:element>
            </xs:sequence>
            <xs:attribute type="xs:short" name="width" use="optional"/>
            <xs:attribute type="xs:short" name="height" use="optional"/>
          </xs:complexType>
        </xs:element>
      </xs:sequence>
      <xs:attribute type="xs:byte" name="pages"/>
    </xs:complexType>
  </xs:element>
</xs:schema>

PDF to XML Conversion

The following code snippet shows the process of converting a PDF file to XML (MobiXML) format.
C#
// Load source PDF file
Document doc = new Document(@"d:\document.pdf");
// Save output in XML format
doc.Save("d:\outFile.xml", SaveFormat.MobiXml);
 
 ----------------------------------------------------

Convert PDF to PPTX

Skip to end of metadata
Go to start of metadata
We have an API named Aspose.Slides which offers the feature to create as well as manipulate PPT/PPTX presentations. This API also provides the feature to convert PPT/PPTX files to PDF format. Recently we received requirement from many of our customers to support the capability of PDF transformation to PPTX format. Starting release of Aspose.Pdf for .NET 10.3.0, we have introduced a feature to transform PDF documents to PPTX format. During this conversion, the individual pages of the PDF file are converted to separate slide in PPTX file.
During PDF to PPTX conversion, the text is rendered as Text where you can select/update it, instead its rendered as image. Please note that in order to convert PDF files to PPTX format, Aspose.Pdf provides a class named PptxSaveOptions. An object of the PptxSaveOptions class is passed as a second argument to the Document.Save(..) method. The following code snippet shows the process for converting PDF file into PPTX format.

C#
// Load PDF document
Aspose.Pdf.Document doc = new Aspose.Pdf.Document(@"C:\pdftest\IN_7664539.pdf");
// Instantiate PptxSaveOptions instance
Aspose.Pdf.PptxSaveOptions pptx_save = new Aspose.Pdf.PptxSaveOptions();
// Save the output in PPTX format
doc.Save("c:/pdftest/IN_7664539.pptx", pptx_save);
 --------------------------------------------

Sunday, 6 December 2015

SQL Server Management Studio Shortcuts

SQL Server Management Studio Shortcuts
Here’s a list of shortcuts available from SQL Server Management Studio (SSMS).  This includes the function keys and what it does in SQL Server Management Studio.  Some of these shortcuts are the same as the ones used in other applications such Microsoft Word like the ones in the Basic Editing Shortcuts.

Basic Editing Shortcuts
Ctrl+X
Cut
Ctrl+C
Copy
Ctrl+V
Paste
Ctrl+A
Select All
Ctrl+Z
Undo
Ctrl+Y
Redo
Ctrl+F
Quick Find
Ctrl+H
Quick Replace
Ctrl+Shift+H
Replace in Files
Ctrl+G
Go To Line

File Shortcuts
Ctrl+N
New Query with Current Connection
Ctrl+Shift+N
New Project
Ctrl+O
Open File
Ctrl+Shift+O
Open Project/Solution
Ctrl+S
Save
Ctrl+Shift+S
Save All
Ctrl+P
Print

View Shortcuts
Ctrl+Alt+G
Registered Servers
Ctrl+Alt+T
Template Explorer
Ctrl+Alt+L
Solution Explorer
Ctrl+K, Ctrl+W
Bookmark Window
Ctrl+Alt+X
Toolbox
Ctrl+\, Ctrl+E
Error List
Ctrl+Alt+R
Web Browser
Ctrl+Alt+K
Task List
Ctrl+Alt+O
Output
Shift+Alt+Enter
Full Screen
Ctrl+-
Navigate Backward

Query Shortcuts
Ctrl+Shift+M
Specify Values for Template Parameters
Ctrl+L
Display Estimated Execution Plan
Ctrl+Alt+P
Trace Query in SQL Server Profiler
Ctrl+Shift+Q
Design Query in Editor
Ctrl+M
Include Actual Execution Plan
Shift+Alt_S
Include Client Statistics
Ctrl+T
Results to Text
Ctrl+D
Results to Grid
Ctrl+Shift+F
Results to File

Window Shortcuts
Ctrl+R
Hide/Show Results Pane

Advanced Editing Shortcuts
Ctrl+Shift+U
Make Uppercase
Ctrl+Shift+L
Make Lowercase
Ctrl+K, Ctrl+\
Delete Horizontal White Space
Ctrl+I
Incremental Search
Ctrl+K, Ctrl+C
Comment Selection
Ctrl+K, Ctrl+U
Uncomment Selection

Bookmarks Shortcuts
Ctrl+K, Ctrl+K
Toggle Bookmark
Ctrl+K, Ctrl+P
Previous Bookmark
Ctrl+K, Ctrl+N
Next Bookmark
Ctrl+K, Ctrl+L
Clear Bookmarks
Ctrl+Shift+K, Ctrl+Shift+P
Previous Bookmark in Folder
Ctrl+Shift+K, Ctrl+Shift+N
Next Bookmark in Folder
Function Keys
F1
Help
Ctrl+F1
Help – How Do I
Ctrl+Alt+F1
Help Contents
Ctrl+Alt+F2
Help Index
F3
Find Next
Ctrl+Alt+F3
Help Search
F4
View Properties Window
F5
Refresh / Execute
Alt-F5
Start Debugging
Ctrl+F5
Parse
Ctrl+Alt+F5
Help Tutorial
F6
Window-Next Pane
Shift+F6
Window-Previous Pane
F7
View Object Explorer Details
F8
View Object Explorer
Alt+F8
Open Server in Object Explorer
F9
Debug-Toggle Break Point
F10
Debug-Step Over
F11
Debug-Step Into

Intellisense Shortcuts
Ctrl+J
List Members
Ctrl+Shift+Space
Parameter Info
Ctrl+K, Ctrl+I
Quick Info
Alt+Right Arrow
Complete Word
Ctrl+Shift+R
Refresh Local Cache

Using SQL Server Configuration Manager

Applies to Windows Vista, Windows 7, and Windows Server 2008
The following procedures configure the Windows Firewall by using the Windows Firewall with Advanced Security Microsoft Management Console (MMC) snap-in. The Windows Firewall with Advanced Security only configures the current profile. For more information about the Windows Firewall with Advanced Security, see Configure the Windows Firewall to Allow SQL Server Access

To open a port in the Windows firewall for TCP access

  1. On the Start menu, click Run, type WF.msc, and then click OK.
  2. In the Windows Firewall with Advanced Security, in the left pane, right-click Inbound Rules, and then click New Rule in the action pane.
  3. In the Rule Type dialog box, select Port, and then click Next.
  4. In the Protocol and Ports dialog box, select TCP. Select Specific local ports, and then type the port number of the instance of the Database Engine, such as 1433 for the default instance. Click Next.
  5. In the Action dialog box, select Allow the connection, and then click Next.
  6. In the Profile dialog box, select any profiles that describe the computer connection environment when you want to connect to the Database Engine, and then click Next.
  7. In the Name dialog box, type a name and description for this rule, and then click Finish.

To open access to SQL Server when using dynamic ports

  1. On the Start menu, click Run, type WF.msc, and then click OK.
  2. In the Windows Firewall with Advanced Security, in the left pane, right-click Inbound Rules, and then click New Rule in the action pane.
  3. In the Rule Type dialog box, select Program, and then click Next.
  4. In the Program dialog box, select This program path. Click Browse, and navigate to the instance of SQL Server that you want to access through the firewall, and then click Open. By default, SQL Server is at C:\Program Files\Microsoft SQL Server\MSSQL13.MSSQLSERVER\MSSQL\Binn\Sqlservr.exe. Click Next.
  5. In the Action dialog box, select Allow the connection, and then click Next.
  6. In the Profile dialog box, select any profiles that describe the computer connection environment when you want to connect to the Database Engine, and then click Next.
  7. In the Name dialog box, type a name and description for this rule, and then click Finish.